How to Read a Progressive Lens Prescription?
Apr 21, 2026
A progressive lens prescription shows how the lens power changes smoothly from distance to near vision, helping people see clearly at every range without visible lines. It combines multiple strengths in one lens using precise measurements like sphere, cylinder, axis, and add power. Each value plays a distinct role in correcting nearsightedness, farsightedness, and presbyopia in a single lens design. Understanding these numbers helps you figure out if the prescription fits your daily vision needs, from driving to reading fine print. By knowing how each part connects, you can check if the prescription matches what you actually experience day to day.
This guide breaks down the key terms, how to interpret progressive-specific data, and how to use this information when buying new glasses. I've pulled together insights from optical pros and real prescription examples to walk you through each step so you can feel more confident about your vision.
Step 1 – Decode The Core Lens Prescription Terms
A progressive lens prescription lists the basic values that correct a person’s vision before adding the multifocal details unique to progressives.
Key terms are explained below:
- Sphere (SPH): Corrects nearsightedness (negative value) or farsightedness (positive value). SPH tells you how much focusing power the lens needs, helping bring distance or near images into sharp focus so things look clear without strain.
- Cylinder (CYL) and Axis: These address astigmatism, which happens when the cornea or lens isn’t perfectly round. CYL shows the lens power needed to fix uneven curvature, while the Axis (0°–180°) pinpoints where that correction goes, making sure lines look straight instead of wavy.
- Prism: Balances eye alignment by shifting images so both eyes work together comfortably. Optometrists include this when one eye drifts a bit and causes double vision, and this alignment support cuts down on headaches and eye fatigue.
- Pupillary Distance (PD): Measures the space between the centers of the pupils. This value makes sure the optical center of each lens lines up with each eye, so you get balanced vision through every part of the progressive lens.
Step 2 – Understand The Progressive‑Specific Data
Progressive‑specific data show how the lens manages both distance and near vision in one continuous surface. These values control how smoothly your focus shifts as your eyes move from far to near objects.
Key elements found only in progressive prescriptions:
- ADD Power: Defines the extra magnifying power for near vision. This value, usually between +0.75 and +3.50 diopters, increases the lens’s strength in the lower part and gives you that reading boost. Its accuracy affects how clearly small print appears, so you don’t have to swap glasses for close-up work.
- Fitting Height: Indicates the vertical distance (in millimeters) from the bottom of the lens to the pupil center. Opticians measure it while you look straight ahead in the chosen frame, and getting this right means the reading and distance zones line up with your eyes’ movement. If it’s off, you might end up tilting your head just to see clearly.
- Corridor Length: Describes the vertical span between distance and near zones where the power gradually changes. Shorter corridors compress this power shift, while longer ones spread it out, which can make transitions smoother if you read a lot or need a wider near field.
Small changes in ADD, fitting height, or corridor design really do affect how the lens feels in daily life.
Step 3 – How To Read An Example Prescription
A progressive lens prescription includes abbreviations and numbers that show how each part of the lens corrects vision. Understanding the role of each number helps you connect the prescription sheet to how the finished lenses will work for you.
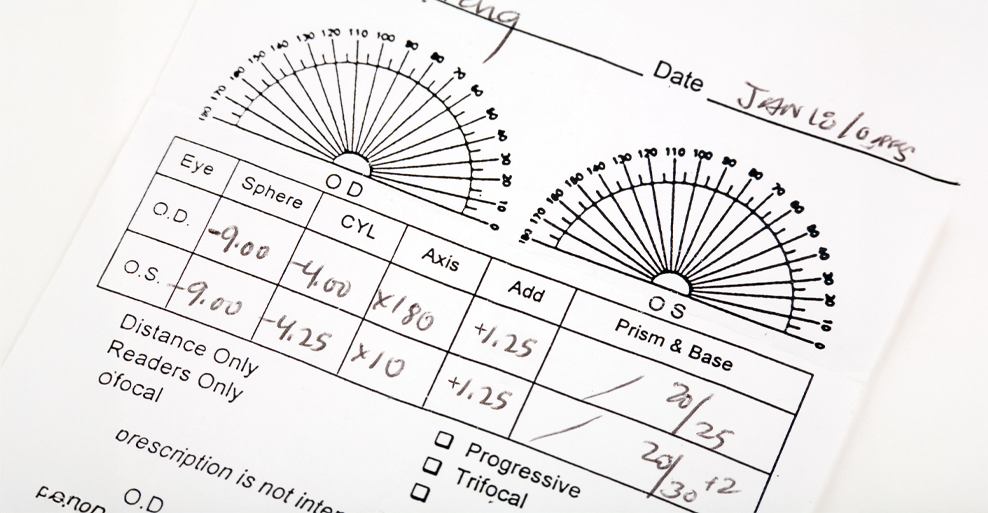
Sample Layout And Annotation (OD/OS Table)
A progressive lens prescription lists separate data for each eye, marked OD (right eye) and OS (left eye). Each row usually includes SPH, CYL, AXIS, ADD, and sometimes PD.
For example, here’s what you might see for each eye:
- Right eye (OD): SPH is -1.25, CYL is -0.75, AXIS is 150, ADD is +2.00, PD is 31.
- Left eye (OS): SPH is -1.00, CYL is -1.00, AXIS is 160, ADD is +2.00, PD is 31.
SPH (Sphere) corrects nearsightedness or farsightedness, with a minus sign for nearsighted correction and a plus sign for farsighted. CYL (Cylinder) and AXIS describe astigmatism correction; CYL shows the strength, and AXIS tells the lab where to put that correction. ADD is the extra power for reading areas in progressive lenses. PD (Pupillary Distance) is the millimeter distance between pupils, which keeps the optical centers lined up for comfort. Each value directly shapes and positions the lens so you can focus at every distance without hassle.
Step‑By‑Step Decoding Walk‑Through
Reading the prescription usually goes in order from distance to near vision. Each number ties to a specific part of the lens.
- First, check SPH to see if you’re myopic or hyperopic. For example, a −1.25 SPH means distant objects look blurry and need concave correction.
- Next, note CYL and AXIS if they’re present—these define astigmatism correction, and the AXIS (1–180 degrees) sets the lens orientation.
- Then, confirm the ADD value. If it’s +2.00, your near vision gets two diopters of extra magnification.
- Finally, review PD. When the centers line up with your pupil spacing, the lenses feel comfortable and don’t strain your eyes.
Spotting Progressive‑Only Indicators
Progressive lens prescriptions include details you won’t find in single‑vision or bifocal prescriptions.
Here’s what to look for:
- You’ll see a positive ADD value in both eyes. Progressives need this to add gradual near‑power transition zones.
- There’s no segment line reference like in bifocals, since the power changes smoothly from top to bottom.
- Both distance (SPH, CYL, AXIS) and near (ADD) data appear on one sheet, which signals a multifocal design.
- Sometimes, you’ll spot “progressive” or “PAL” right on the prescription to confirm the lens type.
These clues make sure you’re ordering progressive lenses, not single‑vision or bifocal by mistake.
Step 4 – Applying Progressive Prescription In Real Life
Accurate communication, good frame fitting, and timely checkups help the prescription work as intended. These steps cut down on visual strain and help you adjust to progressives in your day-to-day life.
Communicating With Your Optician Or Online Retailer
Clear, complete communication makes sure the optical lab reads and fills your progressive prescription correctly.
Here’s how to do it:
- Provide an exact copy of the prescription, including sphere (SPH), cylinder (CYL), axis, and add values for both eyes. If you’re missing or unclear with any data, you might run into alignment errors that mess with near and distance clarity.
- Confirm that PD (pupillary distance) and OC height (optical center height) are measured in millimeters. These numbers decide how the progressive zones line up with your eyes and affect comfort.
- When ordering online, enter all values exactly as written. If you can, attach a photo of the physical prescription to avoid mistakes. Getting it right means smoother focus transitions and less time getting used to your new glasses.
Confirming Fit During Dispensing Or Adjustment
Good frame alignment means the progressive lens zones match up with your actual line of sight. During dispensing, the optician checks that the fitting cross—a little mark to verify lens layout—lines up directly over your pupil. If it’s too high or low, near and intermediate zones can throw off your vision. Nose pads, temple length, and frame tilt all affect lens position. Adjusting these keeps both lenses level and centered while you’re wearing them. The lab uses a reference point to center the reading corridor, not just a guess. Even small tweaks (like 2–3 mm) can sharpen your focus for reading or computer use. When everything’s fitted right, your vision stays stable across distances and you don’t have to tilt your head around just to see clearly.
When To Ask For Re‑Measurement?
Re‑measurement checks that your prescription and frame alignment still work once you start wearing your glasses every day. Ask for re‑measurement if you notice blurred vision at mid-range, dizziness, or ongoing eye strain after a week or more of wearing your glasses. These problems often come from incorrect pupillary distance or height readings, or frames that slip and change lens position. The optician will check your prescription again and make sure your frames fit properly. They might watch how you read or walk to see if the vertical alignment is right. Sometimes, just moving the optical center down by one millimeter can make reading menus or your phone much clearer. Fixing these issues quickly saves you from long adaptation times and keeps you comfortable with your glasses.
Tips & Common Misunderstandings About Progressive Prescription
Little details in a progressive lens prescription can really change how well you see at different distances. If you know what these details mean, you can avoid mistakes and stay comfortable whether you’re reading or driving.
ADD Vs. Reading Glasses Power
The ADD value on your progressive lens prescription shows how much extra magnifying strength is added to the lower part of your lens for close-up focus. Learn more here. The ADD helps with presbyopia, which is when your eyes lose some near focusing power as you age. It only boosts power in the reading area. Reading glasses just use one power for the whole lens. Progressives mix distance correction up top with the ADD power at the bottom. Most ADD values fall between +0.75 and +3.00 diopters. Higher numbers mean stronger magnification for close-up work. Because progressive lenses blend several powers, you can focus at all distances without swapping glasses. That means less strain when you go from your computer to a book.
Common Error: People sometimes mix up the ADD with their total near prescription, which can lead to lenses that feel way too strong for reading.
Why Corridor Length Varies Among Brands?
Corridor length is the vertical space in a progressive lens where the prescription shifts from distance to near vision. Different brands set corridor lengths anywhere from about 10 to 16 millimeters. This controls how fast the lens changes power. Frame size and how you hold your head both play a part in picking the right corridor length. Smaller frames work better with short corridors, while bigger ones need longer corridors for smoother transitions. If the corridor is too short, you might feel distortion or a “swimming” effect as you move your eyes. If it’s too long, you’ll need to drop your chin more to see things up close. So, when you pick your lenses, think about your frame style and your daily habits—like whether you read at a desk or drive a lot.
When Small Units (0.25 Diopter) Make A Big Difference?
Diopter is the unit for lens power. In progressive lenses, even a 0.25 change can make a real difference in comfort. Since these lenses blend several focal zones, a 0.25 shift affects more than one area—especially up close and in the middle range. If your distance vision is off by just a quarter diopter, your eyes have to work harder, which can make you tired or blur your midrange focus. Getting both the sphere and cylinder values right is crucial. For instance, changing from –1.50 to –1.25 diopters might clear up slight distance blur and help with near vision at the same time. For you, that accuracy means sharper transitions across the lens and less time getting used to new glasses.
Understanding Your Prescription Builds Confidence And Accuracy
Reading your progressive lens prescription well means you know how every number and abbreviation affects your vision. OD is for your right eye, OS for your left, SPH for sphere, CYL for cylinder, Axis for orientation, and Add for near vision power. If you understand your prescription, you can check details yourself and ask for lenses that fit your needs. Here’s a guide.
Key Components:
- OD and OS tell you which correction goes to which eye, so you don’t get them mixed up.
- SPH shows if you’re nearsighted or farsighted, and it helps you figure out how strong your distance vision needs to be.
- Add is the extra power for reading, which controls how the bottom part of your lens helps with up-close tasks.
Each part of the prescription has a real-world benefit. For example, if your Add power matches your reading distance, you can read text at about 16 to 18 inches without straining your eyes. When you understand these numbers, you can talk to your optician more clearly and double-check things before your glasses get made.
Always Double‑Check Key Measurements With A Licensed Optician
Getting a licensed optician to check your prescription makes a big difference. They use special tools to measure your pupillary distance, make sure the lenses are centered, and fit your frames right. Checking your prescription with a professional helps you avoid expensive mistakes. If your PD is off by more than one millimeter, you might get eye fatigue or blurry vision at mid-range. Progressive lenses really depend on precise alignment. Opticians also look at your head posture and reading habits to tweak the corridor length, which can help you adjust faster. They’ll confirm your sphere and Add power, too, so both lenses blend smoothly from distance to near. This careful review means you’ll get glasses that feel good in real life. When everything lines up, you’ll notice smoother focus changes and clearer vision all day.
FAQs
What do the numbers on my progressive lens prescription mean?
Every number on your prescription tells you how the lens will fix a specific vision problem. SPH (Sphere) is the correction for nearsightedness (negative) or farsightedness (positive), measured in diopters. CYL (Cylinder) is for astigmatism correction. Higher numbers mean you need more correction. AXIS shows the angle of your astigmatism, anywhere from 1 to 180 degrees. ADD (Addition) is the extra magnifying power for near vision, usually between +0.75 and +3.00. PD (Pupillary Distance) is the space between your pupils in millimeters, making sure the lenses line up with your eyes.
What is the significance of CYL on an eye prescription?
CYL stands for Cylinder and measures how much lens power you need for astigmatism, which comes from an uneven cornea shape. It corrects the uneven curve so light focuses properly on your retina. Negative CYL values usually mean you’re correcting nearsighted astigmatism, while positive ones fix farsighted astigmatism. Getting the CYL right means you’ll see sharply at all distances without weird distortion.
Can you explain how to determine if progressive lenses are accurately fitted?
Good fitting progressive lenses line up each vision zone with the way your eyes naturally move. Your eyes should line up with the optical center of each lens. If not, you’ll probably notice blur or dizziness. When you look straight ahead, you should see clearly into the distance. Looking down should bring near objects into focus without trouble. Opticians often use a layout chart to check that the reading and distance zones are in the right spot compared to your pupils. Even a 1 or 2 millimeter error in PD can cause strain, which shows why it’s so important to measure carefully.
What's the difference in vision clarity between 1.67 and 1.74 index lenses?
The refractive index is about how much the lens bends light to fix your vision.
- 1.67 index lenses are thinner and lighter than standard plastic ones. They work well for moderate prescriptions.
- 1.74 index lenses are the thinnest you can commonly get. These are best for strong prescriptions. More details here.
Both types give you about the same clarity in normal use, but higher index lenses might reflect a bit more light. An anti-reflective coating can cut down on that. Check out coating options. If you have a strong prescription, you’ll probably like 1.74 lenses for their lighter weight and thinner look, without losing vision quality.
How can you interpret a progressive lens prescription from a lensometer reading?
A lensometer checks the power and alignment of finished lenses to make sure they match your prescription. The device reads the sphere, cylinder, and axis values from the different zones of your progressive lens. You start by aligning the distance area, then check the Add power in the near zone. If the numbers from the lensometer match your prescription within the accepted range, you know the lenses are right.
How does one convert eye prescription measurements into lens specifications?
To convert an eye prescription into lens specs, you need to use optical formulas and manufacturer info. This lets you match the prescription power to the physical properties of the lens. Each diopter value lines up with a certain curvature on the lens's front and back surfaces. Lens material matters a lot. Polycarbonate, 1.67, and 1.74 all have different refractive indexes, which changes thickness and optical quality. If you need extra magnifying strength for reading, that's called add power. It gets added to your base distance prescription. Opticians take all these details and do the conversions. Their goal? Make sure your lenses correct your vision and actually fit the frames you've picked out.